Sunday, June 30, 2013

Wall Decoration 1


It was in 2011, I was still working at a school in North Jakarta. 

The school was nice and pretty for they required the teachers to embellish the wall with the decoration that fit to the class theme.

I was confused at the first time, until I saw some samples of how the other teachers did it (Thank to Ms. Erma Crishna for explaining about all details to me)

I was going to teach Nursery 2 at that time. The theme was about weather. 
So, I decorated my class with the weather theme: sunny, windy and rainy. 


This was my sunny day. 

I described it with two children who were playing at the beach. 

The girl was so cute in her swiming suit made of wrapping paper

                                
The boy, he looked so happy playing with the ball.


I emphasized the view of sunny day with the bright sun near the ceiling.


This was my windy day. 


I described it with a whole family who were going on a picnic at the park.


Daddy had mustache on his face. And he was wearing glasses. 


Mommy was wearing pink outfits and carrying the baby. Her skirt was going up because of the wind. :D


There were some food and drink on the mat, such as: biscuits, sandwiches and orange juice. 
I used real snack packaging for the biscuits. And, I made the sandwiches by using the Styrofoam, crepe papers and flannels. For the orange juice, I painted the real mineral bottle with orange.


To indicate windy day, I made the cloud blew some wind in the air :D.


This was my rainy day

I described it with the raindrops falling from the top. 


There were dark clouds on the ceiling which I made by using cartons. 

And the water, they were flannels cut out in teardrop shapes. Then, I pasted them on the plastic and hung it on the top.


This was the house.

It was made of styrofoam. I painted it with some attractive colours. 


These were the trees  and bushes next to the house. I made them by using cartons, flannels and crepe papers.


And the pond,


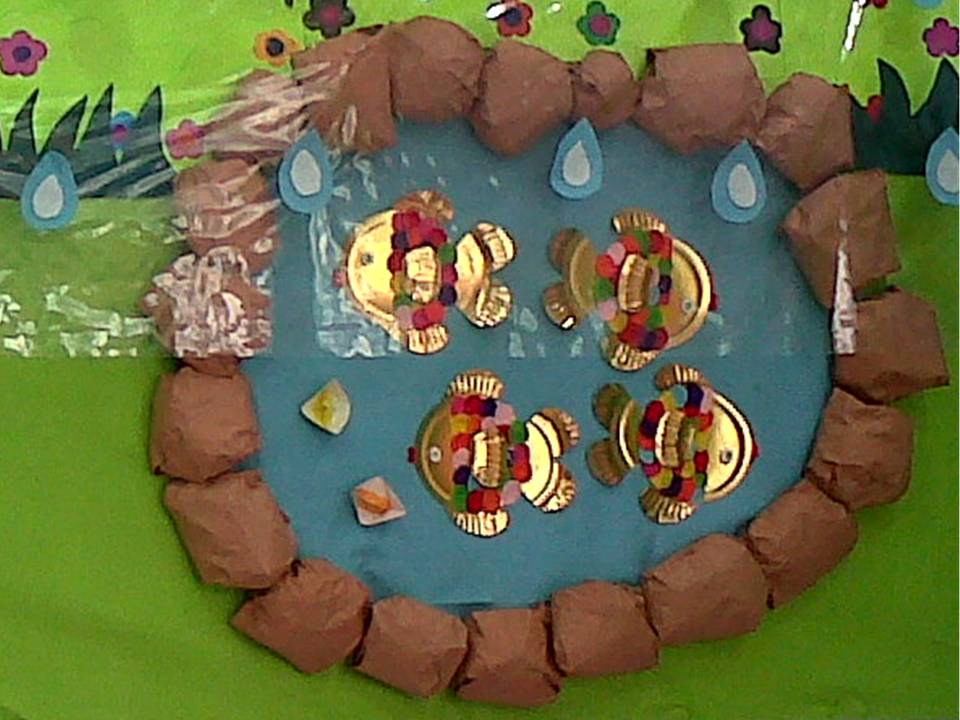
It was divided into 3 parts: the water, stones and fish.

I used flannel for the water. And I made the stones by using used newspapers and then wrapped them with brown.

For the fish, I used gold paper plates and flannels (for the scales).

I did this project for about 2 weeks. It was great meeting wonderful people there. 

Miss you, teachers :D.

Saturday, June 29, 2013

How to Make a Pink Piggy


It’s been my favourite to work with clay.
I love the ideas of how the lump of clay turns out into something cute like this pink piggy.


So, the story started when my school bought 5 sets of DAS clay. They were blue, yellow, red, white and black.


To make a Pink Piggy, I would need red and white clay, then, mixed them up together to get pink colour.

Then, I started it by making piggy's tail. So, I took some of pink clay, then, roll it to make a thin snake.


I twisted the snake into a spiral.


Then, I divided the pink lump into some parts: 
  • A small ball for the head,
  • A bigger one for the body,
  • 5 smaller balls for the legs and the nose,
  • 2 flattened circles for the ears


So, it’s the time to attach each part to make the pig. I used PVAc glue to do it.


Then, I took a pencil and made 2 holes on the nose.


Almost done! I made the eyes by using black clay and pasted them on the face.

And tadaaaaa…

This was the result!


My First Charcoals


It was in 2012 when I celebrated my 27 birthday.

I’ve been so blessed and lucky for being in a workplace surrounded with people who always treat me like a family.

My boss, she cares for everybody as a person.

On my special day, she gave me a set of charcoal pencils and drawing book.

I was so thankful for her and the gifts.

I could gain my drawing skill and do my commission work with the tools.

Thank you, Ms. Jeanne Chrysanthea. 

Thank you, thank you and love you Ms. Jeanne

Again, I feel so blessed and lucky :D


Window Paintings 1


I might say that I was lucky for working at this school.

Why?

Since they required the teachers to paint the windows for esthetical purpose, I gained my experiences working with paints too :)

So, in 2011, I had been introduced to this awesome technique by using sponge (thank to Ms. Helennor Lazco for bringing this idea to me)

It looks simple, but needs lots of effort.

So, how to do it?

First: you’re gonna need boardmarkers, paints, paintbrush, sponge (cut in pieces if necessary) and dry cloth.

Second: choose which side of the window that you’re going to paint. In my opinion, it’s better to do it from the inside, for it will be protected from the rain later on.

Third: draw the window by using a boardmarker, be careful not to erase the result. But, if you need to erase it, just use the dry cloth.

Fourth: dip the sponge into the paint (not soaking it), then pat the sponge onto the window. You will need patience, patience and patience while doing it :D.

The paint will dry quickly. So, you have to paint one part or picture at a time.

For final touch, prepare the black paint to draw the outline. It would be better and nicer if you scrape the outline first with any blunt object before painting it with black.

Here are some samples of window paintings:


Oo I almost forgot, you will need a whole body massage after doing it. Hahaha :D Good luck! J

Thursday, June 27, 2013

Noy's First Oil Pastel Paintings


It was my first week working at a school in East Jakarta.

There was a display presented by Faber Castell.

I was so excited to see what they had. So, I went there after the class dismissal.

There were lots of good stuffs. But, only one object attracted my attention. It was one set of oil pastels. So, I couldn’t resist buying the set of 24 oil pastels.


Then, on the next days, I went to Gramedia Book Store near my house and bought a book (How to paint with pastels – Panduan Melukis dengan Pastel by Philip Berrill ‘The Flying Artist’).


At home, I looked through the book and tried to do the instructions on A4 paper. I preferred seeing the pictures to the words :D

My first trial was not so good. Haha... still needs lots of practices


But, I really enjoyed it, especially when I did these:

1

2

3

4

5

6

7

Then, I put it in a frame :)


Noy and the Girls 1


Hi!!
I'd like to introduced you to my two girls from college, Betty and Nophe


We haven’t met each other for almost 6 years.
So, I tried to make this drawing project to bring me and my friends together in one frame.


This was my first time to combine two different pictures together.


Still needs lots of practice, of course haha…
My friend’s hand was bigger than it should :D

Cheers :D

Miss u, girls:)

post to..